Overview
Learn about Secure Boot, an important security feature required to play some EA games.
What is Secure Boot?
Some EA games require Secure Boot, a Windows 10 and Windows 11 security feature that ensures your PC only loads safe software during startup. Secure Boot allows games supported by EA Javelin Anticheat to detect and remove bad actors, resulting in fewer cheaters and a better experience for players.How to check if Secure Boot is enabled
Use these steps to enable Secure Boot on your PC.On Windows 10 and Windows 11:- 1Select the Windows Key + R. This will open the Run Window.
- 2Type msinfo32 and select the Enter Key or OK.
- 3From the System Information window that opens, select System Summary.
- 4Scroll down to find these values:
- BIOS Mode value should be UEFI
- Secure Boot State value should be On.

- If Secure Boot State is Off, we’ll need to check the BIOS Mode and then enable it.
- If Secure Boot State is Unsupported, check with your motherboard manufacturer’s specification sheet or manual to see if Secure Boot is supported.
- If BIOS Mode is UEFI, then you can move on to how to enable Secure Boot.
- If BIOS Mode is Legacy, you’ll need to check if your Windows disk is MBR or GPT.
Heads up: Your Windows install drive must be set up correctly to support Secure Boot. Secure Boot needs to use GPT (GUID Partition Table) instead of MBR (Master Boot Record).
Requirements to enable Secure Boot
Heads-up: This article is a general guide, but it might not follow the exact steps of your PC.If you’re not used to navigating to and updating your BIOS settings, you should contact a professional or your manufacturer’s customer support. Incorrectly configuring BIOS settings can cause issues with your computer, including failure to start up.We highly recommend that you read your computer or motherboard manufacturer's support resources before updating any BIOS settings. EA doesn’t take responsibility for changes to your BIOS settings.
Refer back to your manufacturer for guidance
Remember—every manufacturer is different, and if at any point when following the steps in this article your PC doesn’t match our instructions, you should refer back to your manufacturer's support resources. Here are links to some of the various manufacturers' guides:General support: Acer SupportSecure Boot, TPM 2.0, and UEFI BIOS: Acer Secure Boot Desktop / Acer Secure Boot Laptop
General support: Dell SupportSecure Boot: Dell Secure BootTPM 2.0: Dell TPM 2.0UEFI BIOS: Dell UEFI BIOS
General support: ASUS SupportSecure Boot: ASUS Secure BootTPM 2.0: ASUS TPM 2.0UEFI BIOS: ASUS UEFI BIOS
General support: ASRock SupportSecure Boot, TPM 2.0, and UEFI BIOS: ASRock Secure Boot
General support: Corsair SupportSecure Boot, TPM 2.0, and UEFI BIOS: How to Fix Secure Boot and TPM 2.0
General support: Dell SupportSecure Boot: Dell Secure BootTPM 2.0: Dell TPM 2.0UEFI BIOS: Dell UEFI BIOS
General support: GIGABYTE SupportSecure Boot: GIGABYTE Secure BootTPM 2.0 and UEFI BIOS: GIGABYTE Windows Security Features
Search for Secure Boot, TPM 2.0, or UEFI BIOS: HP Support
General support: Lenovo SupportSecure Boot: Lenovo Documentation CenterTPM 2.0: Lenovo TPM 2.0UEFI BIOS: Lenovo UEFI
General support: MSI SupportSecure Boot: MSI Secure BootTPM 2.0: MSI TPM 2.0UEFI BIOS: MSI UEFI BIOS
General support: HP SupportSecure Boot, TPM 2.0, and UEFI BIOS:HP PCs – OMEN BIOS setup utility information and menu options | HP® Support
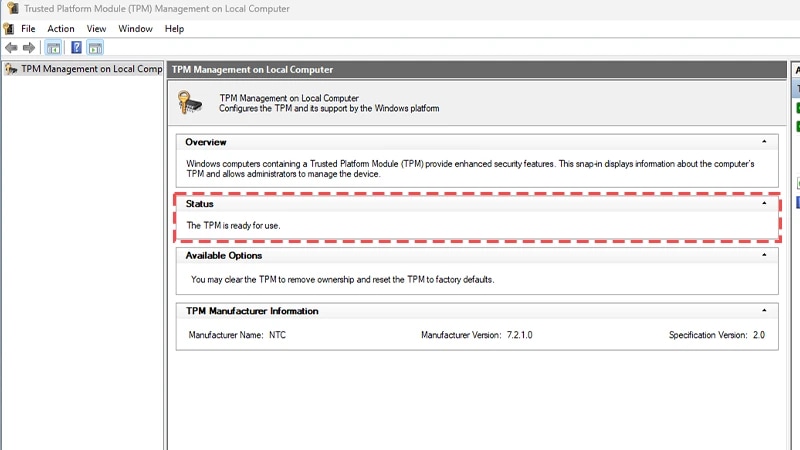
Check if TPM 2.0 is enabled
- 1Select the Windows key and R at the same time to bring up Run Windows.
- 2Type tpm.msc and select the Enter Key.
- 3Check the Status box to see if TPM is ready to use. If it’s ready to use, it’s time to check if your Windows disk is MBR or GPT.
- 4If TPM isn’t ready, refer to your manufacturer on how to correctly enable TPM on your device.
Check if your Windows disk is MBR or GPT
- 1Select the Windows key and X at the same time, then choose Disk Management.
- 2Find the disc that says OSDisk(C:), and right-click the left column, then select Properties.

- 3In the resulting Properties Window, select the Volumes tab.
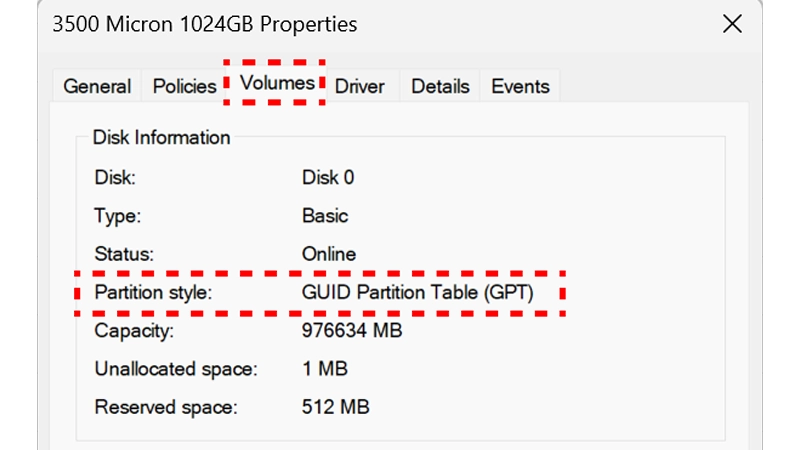
- 4Find Partition style.
- If it says GUID Partition Table (GPT), no action is required.
- If it says MBR, move on to the next step.
Only move on to step 5 if Partition style says MBR. If it says GPT, you’re ready to enable Secure Boot.
- 5Select Windows and R, then type powershell and hit Ctrl + Shift + Enter to open an administrative command prompt.

- Make sure the administrative command prompt says Administrator, then type mbr2gpt /validate /disk:0 /allowfullOS and select Enter. The disk:0 part of the command should match the number listed in the Disk Properties window under the Volume tab.
- 6In the same administrative command prompt, type mbr2gpt /convert /disk:0 /allowfullOS and select Enter.
- The disk:0 part of the command should match the number listed in the Disk Properties window under the Volume tab.

Check if your BIOS is set to UEFI mode
You might be required to switch the Firmware to boot to UEFI mode. Usually, this can be done through the BIOS Settings. Refer to your computer’s brand or manufacturer’s support resources for detailed instructions if you need to switch your Firmware Settings.Now that your Windows disk is set to GPT and your BIOS is set to UEFI, you’re ready to enable Secure Boot.How to enable Secure Boot
Before following these steps, make sure both the TPM 2.0 and UEFI requirements have been successfully enabled.Remember—the BIOS menus for different brands and motherboard manufacturers can differ from those pictured here, so make sure to refer to your manufacturer’s support resources for specifics.
- 1Select the Windows Key and search for Change Advanced Startup Options.
- 2Next to Advanced startup select Restart now. Your computer will restart into Advanced Startup.
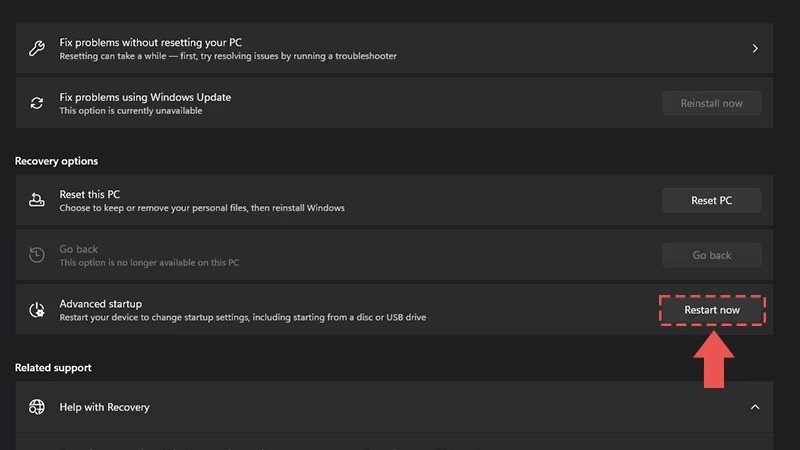
- 3Select Advanced options.

- 4Select UEFI Firmware Settings.

- 5This will enter into your BIOS which should look similar to the following but often differs from one manufacturer to another.

- 6Navigate to the Boot tab, if you are having difficulty finding the correct option, many BIOS have a search function that you can use to find the correct tab and setting Pictured above the search can be accessed by hitting F9.

- 7Secure Boot state should be Enabled.
- If it’s set to Disabled, change it to Enabled.
- Note: If you are unable to modify the setting you will need to refer to your manufacturer for guidance, it is not uncommon for some manufacturers to require that you reset the Secure Boot Keys to factory values or enable the admin password for your Bios before allowing settings to be changed.
- 8OS Type should be set to Window UEFI mode.
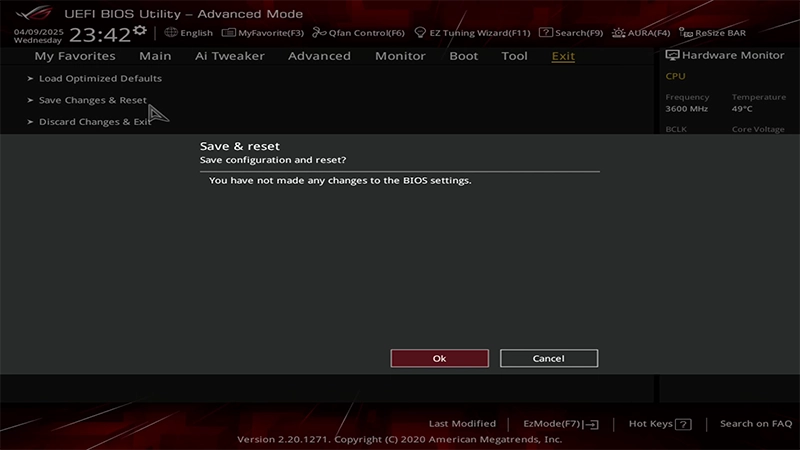
- 9Go to the Exit tab and select Save Changes & Reset.
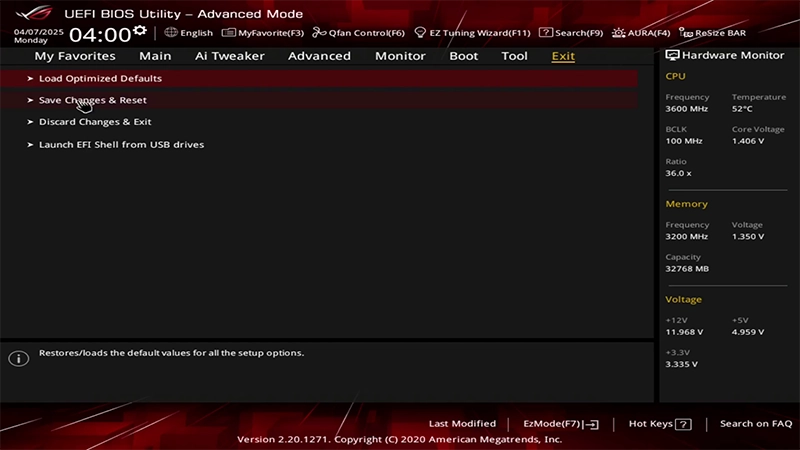
- 10On the resulting confirmation dialog, Select Ok.
- 11Your PC will restart with Secure Boot turned on.