NABÍDKA NABÍDKA

How to use Secure Boot on your PC

Learn about Secure Boot, an important security feature required to play some EA games.

What is Secure Boot?

Some EA games require Secure Boot, a Windows 10 and Windows 11 security feature that ensures your PC only loads safe software during startup.

Secure Boot allows games supported by EA Javelin Anticheat to detect and remove bad actors, resulting in fewer cheaters and a better experience for players.

How to check if Secure Boot is enabled

Pomocí těchto kroků zabezpečené spouštění na svůj PC zapněte, případně zhlédněte naše video.

Ve Windows 10 a Windows 11:
  1. Stiskněte klávesu Windows + R. Tím se otevře okno Spustit.
  2. Napište msinfo32 a stiskněte klávesu Enter nebo vyberte OK.
  3. V otevřeném okně Systémové informace vyberte Souhrn systémových informací
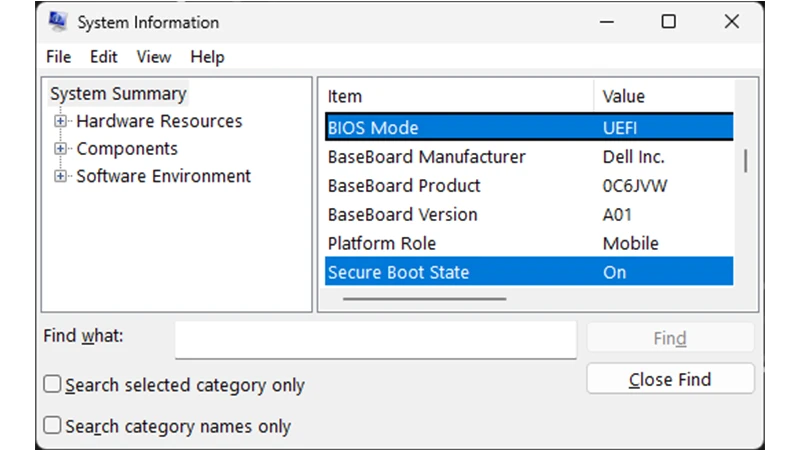
  4. Sjeďte dolů a vyhledejte tyto hodnoty:
    • Hodnota položky Režim systému BIOS by měla být UEFI
    • Hodnota položky Stav zabezpečeného spouštění by měla být Zapnuto.

Okno Systémové informace se Souhrnem systémových informací vlevo, vpravo režim systému BIOS jako UEFI a stav zabezpečeného spouštění jako Zapnuto.

Heads up: Your Windows install drive must be set up correctly to support Secure Boot. Secure Boot needs to use GPT (GUID Partition Table) instead of MBR (Master Boot Record).

Requirements to enable Secure Boot

Heads-up: This article is a general guide, but it might not follow the exact steps of your PC.

If you’re not used to navigating to and updating your BIOS settings, you should contact a professional or your manufacturer’s customer support. Incorrectly configuring BIOS settings can cause issues with your computer, including failure to start up.

We highly recommend that you read your computer or motherboard manufacturer's support resources before updating any BIOS settings. EA doesn’t take responsibility for changes to your BIOS settings.

Let’s check if Secure Boot’s requirement, TPM 2.0 is turned on and make sure the Windows disk is GPT and not MBR. You can jump straight to enabling Secure Boot if you’ve already done these steps.

Refer back to your manufacturer for guidance

Remember—every manufacturer is different, and if at any point when following the steps in this article your PC doesn’t match our instructions, you should refer back to your manufacturer's support resources. Here are links to some of the various manufacturers' guides:

Manufacturer

General Support

Secure Boot

TPM 2.0

UEFI BIOS

Acer

Acer Support

Acer Secure Boot Desktop / Acer Secure Boot Laptop

Alienware (Dell)

Dell Support

Dell Secure Boot

Dell TPM 2.0

Dell UEFI BIOS

ASUS

ASUS Support

ASUS Secure Boot

ASUS TPM 2.0

ASUS UEFI BIOS

ASRock

ASRock Support

ASRock Secure Boot

Corsair

Corsair Support

How to Fix Secure Boot and TPM 2.0

Dell

Dell Support

Dell Secure Boot

Dell TPM 2.0

Dell UEFI BIOS

Gigabyte

GIGABYTE Support

GIGABYTE Secure Boot

GIGABYTE Windows Security Features

HP

HP Support

HP Secure Boot

HP TPM 2.0

HP UEFI Bios

Lenovo

Lenovo Support

Lenovo Documentation Center

Lenovo TPM 2.0

Lenovo UEFI

MSI

MSI Support

MSI Secure Boot

MSI TPM 2.0

MSI UEFI BIOS

Omen (HP)

HP Support

HP PCs – OMEN BIOS setup utility information and menu options | HP® Support

Check if TPM 2.0 is enabled

  1. Select the Windows key and R at the same time to bring up Run Windows.
  2. Type tpm.msc and select the Enter Key.
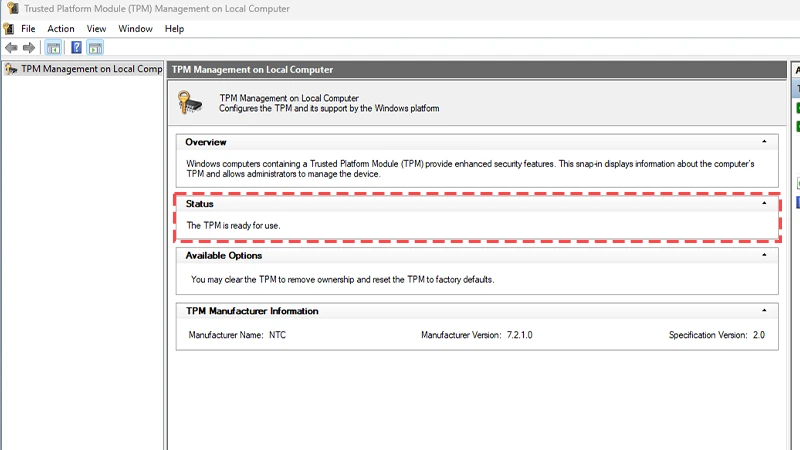
  3. Check the Status box to see if TPM is ready to use. If it’s ready to use, it’s time to check if your Windows disk is MBR or GPT.
  4. If TPM isn’t ready, refer to your manufacturer on how to correctly enable TPM on your device.

The TPM Management window showing the TPM Status as ready to use.

Check if your Windows disk is MBR or GPT

1. Select the Windows key and X at the same time, then choose Disk Management.

2. Find the disc that says OSDisk(C:), and right-click the left column, then select Properties.

The Disk Management window highlighting the Properties button in Step 2.

3. In the resulting Properties Window, select the Volumes tab.

4. Find Partition style.

  • If it says GUID Partition Table (GPT), no action is required. 
  • If it says MBR, move on to the next step.

Only move on to step 5 if Partition style says MBR. If it says GPT, you’re ready to enable Secure Boot.

5. Select Windows and R, then type cmd and hit Ctrl + Shift + Enter to open an administrative command prompt.

An example of the administrative command prompt, showing the required commands described in Step 5.

  • Make sure the administrative command prompt says Administrator, then type mbr2gpt/validate/disk:0/allowFullOS and select Enter. The disk:0 part of the command should match the number listed in the Disk Properties window under the Volume tab.

6. In the same administrative command prompt, type mbr2gpt/convert/disk:0/allowfullOS and select Enter.
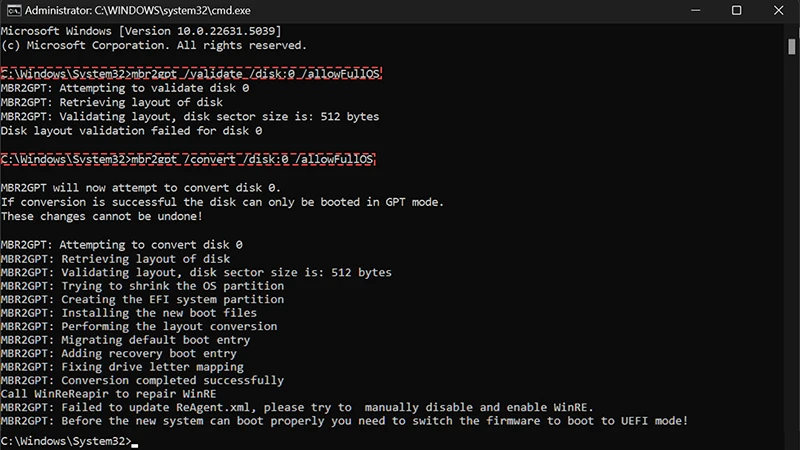
  • The disk:0 part of the command should match the number listed in the Disk Properties window under the Volume tab.

An example of the administrative command prompt, showing the required commands described in Step 6.

Check if your BIOS is set to UEFI mode

You might be required to switch the Firmware to boot to UEFI mode. Usually, this can be done through the BIOS Settings. Refer to your computer’s brand or manufacturer’s support resources for detailed instructions if you need to switch your Firmware Settings.

Now that if your Windows disk is set to GPT and your BIOS is set to UEFI, you’re ready to enable Secure Boot.

How to enable Secure Boot

Before following these steps, make sure both the TPM 2.0 and UEFI are requirements have been successfully enabled.

You can also check the steps in our video here.

Remember—the BIOS menus for different brands and motherboard manufacturers can differ from those pictured here, so make sure to refer to your manufacturer’s support resources for specifics.

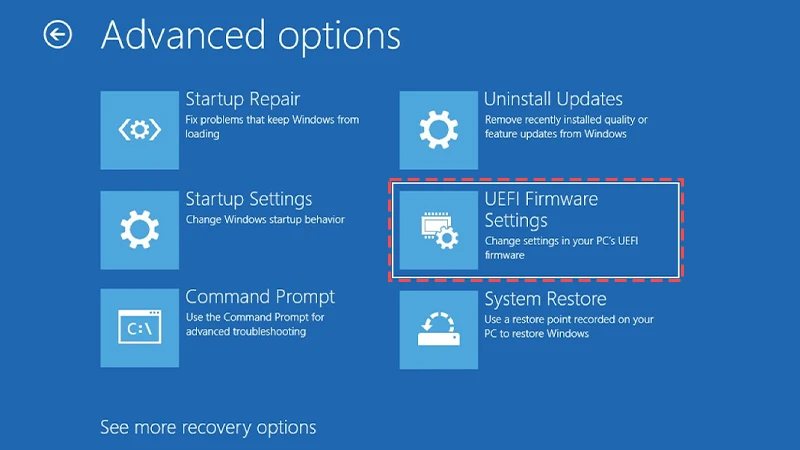
  1. Select the Windows Key and search for Change Advanced Startup Options.
  2. Next to Advanced startup select Restart now. Your computer will restart into Advanced Startup.
  3. An example of the BIOS menu highlighting the Advanced startup button.
  4. Select Advanced options.
  5. Select UEFI Firmware Settings.
  6. The Advanced options window, highlighting the UEFI Firmware Settings option.
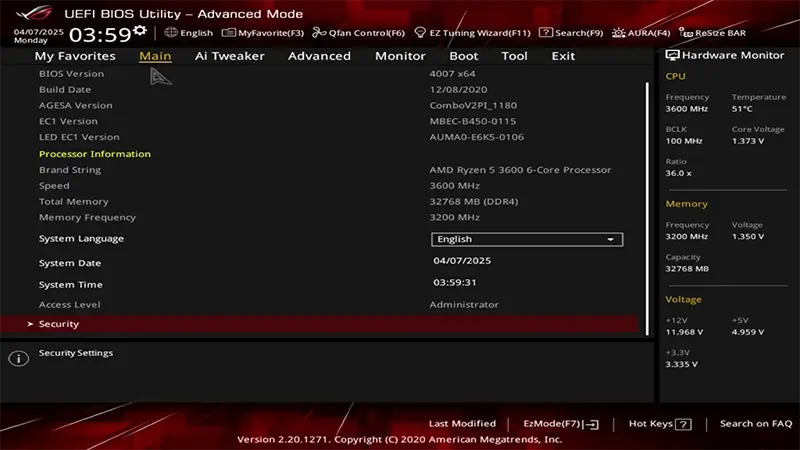
  7. This will enter into your BIOS which should look similar to the following but often differs from one manufacturer to another.
  8. The Advanced options window, highlighting the UEFI Firmware Settings option.

  9. Navigate to the Boot tab, if you are having difficulty finding the correct option, many BIOS have a search function that you can use to find the correct tab and setting Pictured above the search can be accessed by hitting F9.

    An example of the Boot tab in Advanced Mode of the UEFI BIOS Utility.

  10. Secure Boot state should be Enabled.
    • If it’s set to Disabled, change it to Enabled.
    • Note: If you are unable to modify the setting you will need to refer to your manufacturer for guidance, it is not uncommon for some manufacturers to require that you reset the Secure Boot Keys to factory values or enable the admin password for your Bios before allowing settings to be changed.
  11. OS Type should be set to Window UEFI mode.
  12. Go to the Exit tab and select Save Changes & Reset.
  13. An example of the Exit tab in Advanced Mode of the UEFI BIOS Utility..

  14. On the resulting confirmation dialog, Select Ok.
  15. An example of the Exit tab in Advanced Mode of the UEFI BIOS Utility..

  16. Your PC will restart with Secure Boot turned on.

After enabling Secure Boot, try launching your game again. If you’ve successfully enabled Secure Boot and its dependencies you should no longer get a warning asking you to enable the feature. On some versions of Windows an additional restart may be required for the feature to fully enable.

Still having problems?

  • Head to EA Forums to chat with the community.
  • Follow @EAHelp for everything from outage info to game news.

Was this article helpful?

0% of 0 players found this article helpful.
Nenašli jste, co jste hledali? Zkuste to znovu.

Was this article helpful?

0% of 0 players found this article helpful.
X